Showing posts with label Crafts. Show all posts

Friday, February 14, 2014

A ruler growth chart for our growing family

Life is about to get more crazy wonderful - we are expecting a new addition to our family in April! Soon our family of three will be a family of four. What a miracle children are - to in an instant have a new little soul entrusted to your care. To both bring life into the world and forever have your life changed by it's blessing.

Our days of late have been filled with baby preparations and spending quality time with our toddler before his little life is forever changed. As you may have noticed by the lack of posts, in recent months my blog has had to take a backseat to, well, life. 

Another thing consuming my time is an uncontrollable urge to tear apart the house and get it in tip-top shape before the baby arrives. You know what I’m talking about: nesting. From re-organizing our son’s closet (which he will soon be sharing with his baby brother or sister) to finishing long-forgotten crafts and tackling big projects like replacing sliding doors, I am driven by what seems to be an internal hamster on speed.

One of the projects I recently crossed off the craft list is a ruler height chart for our soon-to-be growing family. I’m so happy with how it turned out and the best part is that the supplies were virtually free. Now comes the tough part – finding a way to mark it up and actually use it after all that hard work.


If you're looking for an attractive, low-cost way to record your children's growth milestones, this project may be for you. Read on for simple steps to make your own ruler height chart.

Cheers!

Julie

Giant Ruler Height Chart

Supplies
  • Wood board: Ours is about 12'' x 1'' x 5', but you could also use an 8'' width board and/or get one closer to 6' long (if you plan to take height measurements well into the teenage years!). My husband found this one laying around at his winery so we got it for free. If you buy one it will cost about $10-$20, depending upon the type of wood. 
  • Sand paper
  • Stain
  • Ruler 
  • Steel Square
  • Ballpoint pen
  • Sharpies (thin and thick)
Instructions

1. Sand your board to a point where it is smooth to the touch. Little hands will be coming into contact with this so you want to make sure there are no jagged edges or splinters. As you sand, go with the grain to prevent sanding marks. As our board was in awful shape (who knows how many years it sat outside in the elements), I had to break out the big guns and use a power sander.

2. Stain the board. I had a few old  cans of stain in the garage so I tested each on the back of the board to find the best look. I used walnut. Use an old rag to apply the stain, again going with the grain. I used only one coat as I didn't want the board to be too dark.

3. Using a ruler or yard stick, make small 1'' tic marks with a pencil on the side of your board that will have the ruler lines.

4. Decide where you want your chart to start - i.e. will it hang 6 inches or 1 foot off the ground? This will tell you how to place the numbers on the chart. Ours starts 6 inches off the ground.

5. Make the ruler lines. There are two heights of line that I used - the short ones are 1.5'' and the long ones are 3''. There is a repeating pattern of 1 long, 2 short, 1 long, 2 short, etc. all the way up the board. A tool like a steel square will help you keep your lines straight. (Thank goodness my husband has a well-stocked tool bench!) Using those 1'' tic marks in step three, I marked my lines first with pencil, and then went over them with the thick Sharpie - all the while repeating to myself, "You are using a permanent marker. You are using a permanent marker." I'm just the sort to accidentally wave my hand with a Sharpie in it and then curse myself when I ruin a project.

6. Add the numbers every 12'' (depending upon where you start your ruler). I originally bought stencils and then realized I didn't need them. Back to Home Depot they went. Instead I printed 3'' numbers in Times New Roman on regular printer paper. Then I placed the sheet of paper on the board and traced each number with a ballpoint pen (using a LOT of pressure). What was left was a light outline of the number on the board. I used my thin Sharpie marker to trace the outside of the number, and used the thick marker to fill it in.

7. Our board is HEAVY. It's also slightly bowed. To hang it securely to the wall, I enlisted my husband's expertise. He used two "keyhole" hangers placed about 6'' from the top, which sit on screws anchored into the wall.

8. Done! On my son's second birthday we marked his height - for now with masking tape.

You might also like...

1. Easy, frugal and festive: Salt Dough Christmas Ornaments
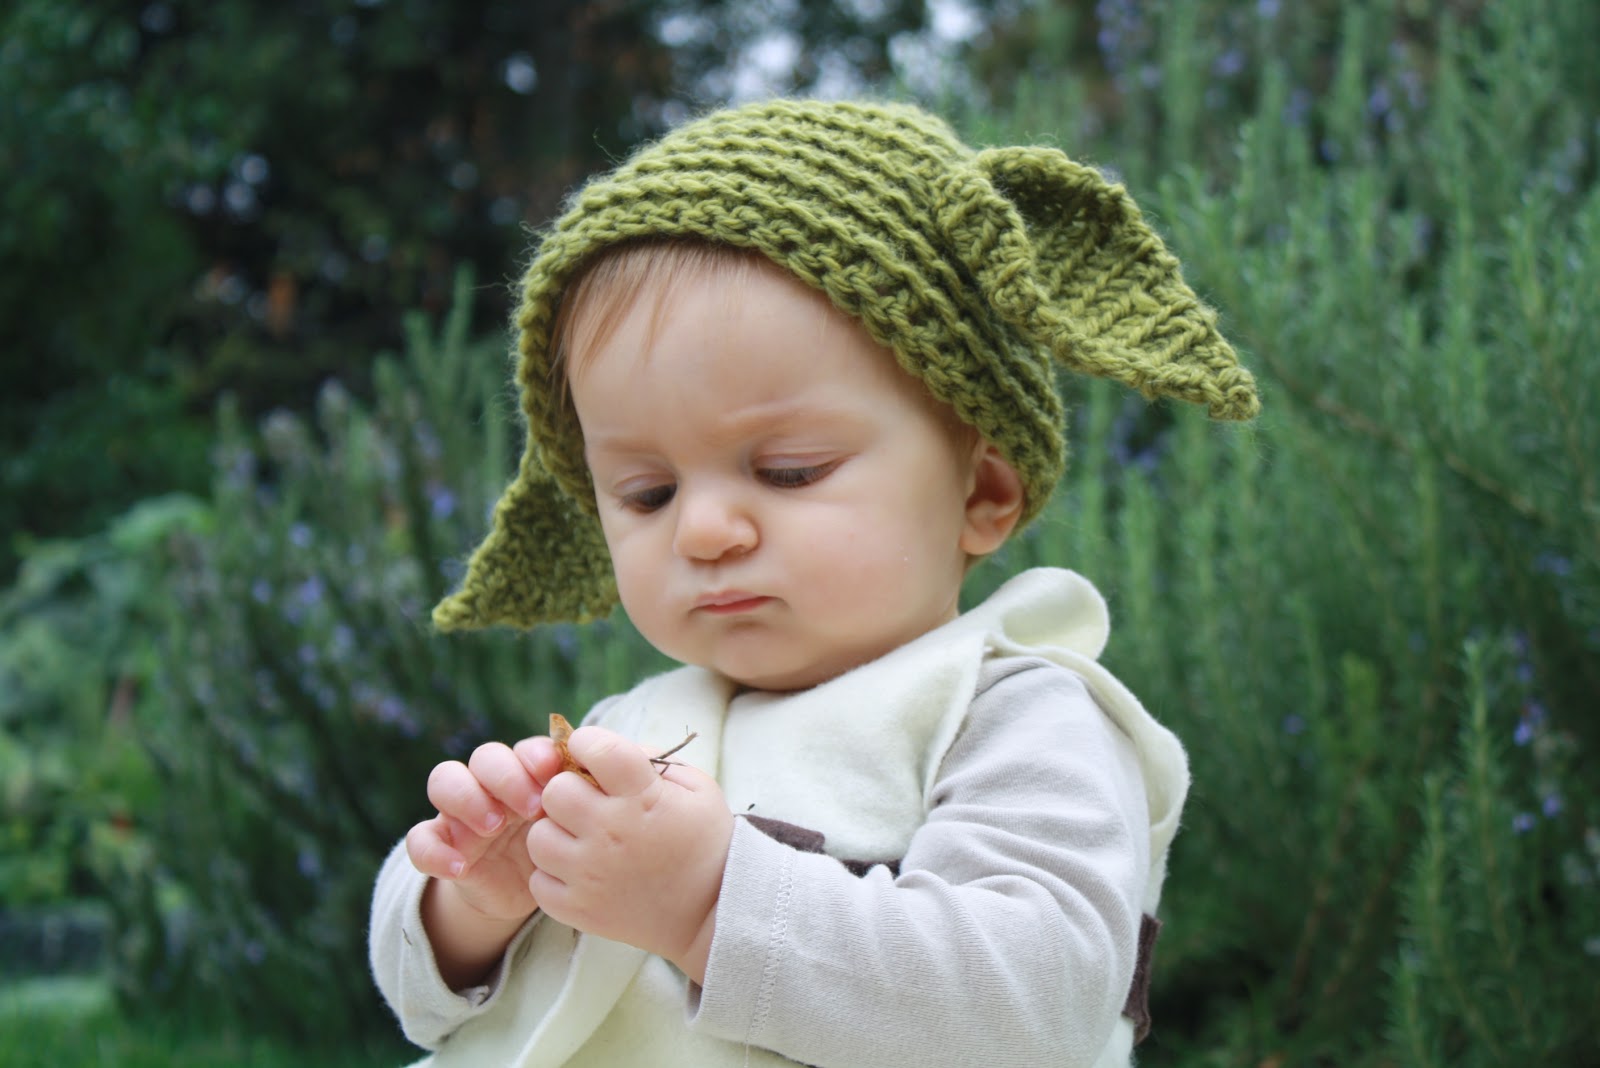
2. Crochet your baby a Yoda hat
3. Throw a birthday party on a budget


Sunday, December 22, 2013

Easy, frugal and festive: Salt Dough Christmas Ornaments

With our son nearly two years old, this year we can really have fun with Christmas. Over the last month we've been learning about baby Jesus, taking photos with Santa Claus, baking Christmas cookies, singing Christmas carols, and dancing like crazy to Mannheim Steamroller. Hey, don't judge. I blame my parents.

At what seemed like the last minute - about a week before Christmas - I decided I wanted to make Christmas ornaments with William. He's at the age where he can appreciate crafts, if with a very, very short attention span. Given that I was already in the midst of umpteen Christmas projects - per the usual, biting off too much for the season - I wanted to find something that was easy. No rushing to the craft store for supplies, no cutting 100 pieces of felt, no glitter to clean up - you get the idea.


Enter salt dough Christmas ornaments. You know - those crumbling things on your parents' Christmas tree that you made when you were two. I had just about all of the ingredients/supplies I needed in the house and the instructions were super simple. We could make one for us and at the same time do one for the grandparents, aunts, uncles - perfect! What's better, with a few extra steps I could (hopefully) strengthen the ornaments so that, twenty years from now, they're not crumbling as well.


Whether you're looking for a last minute kid-friendly Christmas ornament project or just something fun to do over the holiday break, you can't go wrong with these simple crafts. Below are instructions on how to get started.

Merry Christmas!

Julie

Salt Dough Christmas Ornaments 
Recipe will make 6-8 ornaments

1 cup flour
1/2 cup salt (I used kosher because it's all I had on hand - wouldn't recommend, but it still worked)
1/2 cup water
Straw
Cookie Cutters
Paint (acrylic or water-based, though acrylic should hold up better over time)
Paintbrushes (or fingers for water-based paint)
Ribbon
Optional (to strengthen/seal the ornaments): Gesso and Gel Medium 

1. Preheat oven to 250 degrees.
2. Mix the flour, salt and water together and work into a dough. Knead the dough on a floured surface until it becomes smooth. It should not be sticking to your hands - if so, add more flour.
3. To make your ornaments, you can either roll it out as a cookie dough and use cookie cutters, or roll little freehand circles or other shapes. You could even do a handprint or footprint. You want the end result to be about 1/4 inch think. Have fun here and get your child involved!


4. Use a straw to make a hole at the top of each ornament.
5. Put onto an ungreased cookie sheet and bake for two hours.
6. Remove from oven and allow to cool.
7. If using the gesso (which is basically a primer that will turn your ornaments white), apply this now. I timed the project so I could put the gesso on the ornaments while William was napping. It dries very quickly.


8. Get out paint and paintbrushes for your child and let them go crazy!
9. When the paint is dry, if you would like to seal your ornaments and make them shiny, apply a few thin coats of a glossy gel medium.
10. Thread ribbon through the hole.
11. Hang on the tree with your little one! 


You might also like...

1. Make Easy Peppermint Costumes
2. Crochet your baby a Yoda hat
3. Throw a birthday party on a budget

Monday, August 5, 2013

A Napa Valley Peach Harvest

Biting into a ripe, juicy peach - the kind where the juice runs down your hand and drips off your elbow - means summer has officially arrived.


This year, that moment occurred for our family in early July when we arrived home from vacation to find our peach tree so laden with fruit that branches were laying on the ground. After four years, our tree had finally decided it was going to bear fruit. And bear fruit it did. Bushels and bushels of it.

It would be a conservative estimate to say we picked 100 peaches over the course of the next two weeks (nonwithstanding the countless number that fell to the ground). We ate peaches for breakfast, lunch and dinner. We gave them to friends. I think our 18-month old son lived on peaches alone for days on end (to his glee, I might add). And yet this barely made a dent in the pile of fresh fruit blanketing our patio table.

It was time to get to work.

As a child I spent a lot of time in Ohio, visiting my grandparents' farm. I always loved peeking into their root cellar to see canned fruits and vegetables neatly lined up along the shelves. The colorful rainbow that the jars made - red tomatoes, green beans, pink rhubarb, orange peaches - captured the essence of summer.

While our idea of preserving food is much different that my grandmother's - she canned/froze to feed a family of nine and we do so for three - when I'm in the kitchen in the heat of a summer afternoon with a big pot of water boiling on the stovetop, freshly sanitized jars on the counter and something delicious and bubbling ready to fill them (say, peach salsa), I like to think that she would be proud.

In preserving this year's peach harvest we canned, froze, dehydrated and baked. Have your own bushel of peaches? I hope you find some inspiration below.


Peach Salsa

Courtesy of the Ball Book of Complete Home Preserving

Note: If you haven't canned before, I highly recommend taking the Ball Book of Complete Home Preserving out from the library to read about the process, or visit their website for more information. When canning, it is extremely important for food safety to follow the recipe to a tee as you want an appropriate balance of acid, salt and sugar.

Makes about eight 8-ounce jars

1/2 cup white vinegar
6 cups chopped, pitted and peeled peaches 
1 1/4 cups chopped red onion
4 jalepeno peppers, finely chopped
1 red bell pepper, seeded and chopped
1/2 cup loosely packed finely chopped cilantro
2 tbsp honey
1/2 tsp ground cumin
1/2 tsp cayenne pepper

1. Prepare canner, jars and lids.
2. In a large stainless steel saucepan, combine vinegar and peaches (to prevent the peaches from browning, put the vinegar into the pot first and as you cut the peaches, add them to the vinegar and stir). Add onion, jalapeno, red pepper, cilantro, honey, garlic, cumin and cayenne. Bring to a boil over medium-high heat, stirring constantly. Reduce heat and boil gently, stirring frequently, until slightly thickened, about 5 minutes. Remove from heat.
3. Ladle hot salsa into hot jars, leaving 1/2 inch (1 cm) headspace. Remove air bubbles and adjust headspace, if necessary, by adding hot salsa. Wipe rim. Center lid on jar. Screw band down until resistance is met, then increase to fingertip-tight.
4. Place jars in canner, ensuring they are completely covered with water. Bring to a boil and process for 15 minutes. Remove canner lid. Wait 5 minutes, then remove jars, cool and store.

Spiced Peach Jam

Courtesy of Preserving the Harvest, by Carol W. Costenbader

Makes five 1/2 pints

4 pounds (about 8 large) peaches, peeled, pitted and chopped
5 cups sugar
2 tablespoons lemon juice
1/2 teaspoon ground nutmeg
1/8 teaspoon ground cinnamon

1. Place all ingredients in a heavy 8-quart saucepan. Cook over medium heat, stirring constantly, to dissolve the sugar.
2. Bring to a boil, stirring constantly, and boil until the mixture reaches 220 F on a cooking thermometer.
3. Ladle into sterile jars, allowing 1/4 inch of headspace. Cap and seal.
4. Process for 15 minutes in a boiling water bath canner.

Fruit Leather

Pit your peaches and place them in a food processor or blender. Blend until smooth. If using a dehydrator, follow the manufacturer's instructions. If using your oven, pour the puree onto a rimmed cookie sheet lined with plastic wrap or freezer paper. The puree should be about 1/8 - 1/4 of an inch think (the thinner the fruit leather, the less time it will take to dry). Place in a 135 degree oven for 8-10 hours. Set the door ajar with a spoon handle to maintain the low temperature and allow for moisture to escape.

Peach Cobbler

This summer I discovered a recipe for the best, easiest, you-probably-already-have-the-ingredients-on-hand peach cobbler. Per the usual, it came from one of my favorite blogs: Dinner, a love story. I made this cobbler at least four times with our fresh peaches and every time it came out perfect.  

Frozen Peaches

Peaches should be wet packed, meaning they should be frozen in liquid. This year I froze our peaches in a 'honey pack,' a syrup made of 1 cup mild honey and 4 cups water. You can also use a 'sugar pack' - just substitute the sugar for the honey.

To make your syrup, heat the sweetener and water to a boil in a large stockpot. Let the syrup cool completely. Add 1-2 tablespoons of lemon juice to your syrup to keep your peaches from darkening.

You can freeze peaches with or without the skins, either in slices or halves. As this was our first year freezing peaches I tried freezing them every which way so that next year I'll know what works best.

Add your sliced/halved peaches to your freezer container of choice (you can use plastic containers or glass canning jars). Use the syrup to cover the peaches, leaving 1/2 inch of headspace in pint size containers and 1 inch of headspace for quarts.

Place in the freezer and add to your freezer list.

You might also like...

1. Winter Squash-a-Paloooza
2. Eating Well on the Cheap: Keeping a stocked freezer
3. How my slow cooker got her groove back

Saturday, June 15, 2013

Have a fun & frugal Father's Day

Happy Father's Day to all of the dads out there - including my incredible husband!

In celebrating holidays, our family has found that we don't need to spend a lot of money on gifts to communicate how much we care for one another. In fact, I've discovered that the less money we spend, the more creative and thoughtful we are in our gift giving.

This year for Father's Day, Will and I did a little "I love Dad" photo shoot in our backyard with some sidewalk chalk. (If there are any procrastinators out there, this idea is both frugal and a good last-minute gift idea.) It doesn't need to be perfect - just have fun!

On Father's Day we're going to let Dad sleep in, have a lazy breakfast with Eggs Benedict (Dad's favorite), present him with our gifts and let him put his feet up for the rest of the day. Unless, of course, he'd rather spend his "day off" working in the garden - we frugal folk aren't good at sitting still for long.

What are some of your favorite frugal Father's Day crafts or gifts?

Cheers to dads!

Julie

Friday, February 1, 2013

Throwing a birthday party on a budget

Our little boy is turning one! Strange as it may seem, there was a part of me (OK, let's be real - the whole me) that thought this day would never come. That our little man would stay little forever. Denial? Perhaps. Well, earth-to-mom - time only starts moving faster after having kids.

After I got over the initial shock that this day was indeed upon us, it was onto the fun part - planning a memorable (and inexpensive) get-together to celebrate Will's big day. I wanted to keep it low-key and fun - aka. not turn it into an overly orchestrated Martha Stewart-esque party that would stress me out - but in typical fashion I needed to let the creative wheels turn at least a little bit. My goals with the party were 1) fun for Will and the attending kids, 2) fun for me to plan and not too much work and 3) of course, cheap!

I'm happy to report that the party was all of the above and more. It was one of those special days that we'll never forget (especially not with all the photos snapped and videos taped), and it was relaxed enough for all of us to enjoy it - including the birthday boy and mom. From budget to decorations to - of course - the cake, below are what I hope are helpful tips on how to throw a fun and frugal birthday party.
    Timing: Less is more. We hosted our party from 1:30 - 3:30 and that allowed us plenty of time to enjoy the moment and then wrap things up before the kids got too tired. The timing fit with Will's nap schedule and that of his friends (although it's impossible to accommodate everyone), and also meant that we wouldn't need to do lunch (thus saving money and mommy's sanity).
      Invitation List: Who to invite? For a few days I had flashbacks to the lengthy process of putting together our wedding guest list and felt like I needed to check myself into a 12 step program for the decision-making impaired. But seriously - where do you draw the line? Do you invite friends from school? His or her teacher? Your friends both with and without kids? The answer is going to depend on your individual situation and I say go with your gut. I erred on the side of small and simple and we ended up with two families attending (though I invited and planned for five - January is apparently a challenging month to throw a kids' party) and his school teacher. It was the perfect size. (After the fact, my mother-in-law told me a good rule of thumb for planning kids' birthday parties: the number of kids invited should be close to the child's age plus one. So, for instance, you should invite three kids to a birthday party for a two-year-old.)
        Budget: I gave myself a $100 budget to throw the party and made it work. How did I do it? Here is the breakdown.

        $20 for invitations and postage
        $50 for food and drinks
        $20 for decorations, activities and plates/cups
        $10 for goody bags

        Food and Drink:
          Cake: A few months back I found a mold for a giant cupcake at a garage sale for $1 and snagged it knowing it would be perfect for his first birthday party - and many a bake-sale in our future. I made a yellow butter cake ($2 mix) with homemade strawberry filling ($3), cream cheese frosting ($2) and sprinkles ($2). While I considered making the cake and frosting from scratch, considering my track-record when it comes to baking I decided to push the 'easy' button and buy cake mix and ready-made frosting. Don't have a giant cupcake mold? Make regular cupcakes - they're inexpensive and the perfect size for both kids and adults. (Tip: I discovered that you can use a turkey-injector to put filling in the middle of cupcakes - just make sure the filling has been thinned in your food processor and inject the cupcakes before you frost them. Score!)

          Food: I easily could have gone overboard here and had to reign myself in a few times. I made three types of tea sandwiches that were also kid friendly - hummus and roasted red pepper on wheat ($5), cheese and fig spread on wheat ($8), and cucumber, cream cheese and dill on white bread ($5). Other than that, I kept it really simple and put out some cheese cubes ($2), grape tomatoes ($3) and chips ($2). After all, what guests are really looking forward to is the cake.

          Drinks: We got a 12 pack of beer ($12), apple juice ($2), ginger ale ($1) and sparkling water ($2). We avoided drinks with bright colors, thus no worrying about stains on the carpet.

          Decorations: This is a flexible part of the budget because you can do as little or as much as you want - for me, this is where I wanted to have a little fun. I bought the necessities (plates for $3 and napkins for $2), hats ($2), balloons ($5 filled), and a cute felt 'Happy Birthday' sign at Target for $5 (there is no way I could have made that for less).  To add a little extra pizazz, I made and hung tissue paper pom poms around the house for a grand total of $4 (really, more like $2 as I didn't use all of the paper).
                Kids' activities: Keep it simple! I had some crayons and paper as back-up, but didn't need them as cake and the opening of presents offered plenty of excitement.

                Goody bags: I certainly didn't need these for a first birthday party, but found some cupcake themed goody bags on sale at World Market for $2 that I couldn't pass up. I added some rubber duckies for $1 a piece and voila - done.

                Planning: This is my type A personality talking, but I found it helpful to spread the to-do list out over the week so that I didn't feel overwhelmed come Friday/Saturday. As in decorate house on Wednesday, make grocery list on Thursday, shop and bake cake on Friday, etc. A little forethought here went a long way because Lord knows life is unpredictable with a soon-to-be one-year-old!

                Video and Photos: Get some help here! You simply can't do it all and play host at the same time - not to mention that the guest of honor is going to need a lot of your attention throughout the whole party. Ask two friends or family members to help with photos and video and let them know what you want them to capture - like your little one stuffing cake in his or her mouth (or eating crumbs off the floor...just saying...) or ripping up wrapping paper.

                Have fun! Above all, once the day arrives go with the flow and don't sweat the small stuff. The most important thing is to enjoy the company of family and friends and help your little one feel at ease. The more relaxed you are, the most relaxed everyone - including the birthday boy or girl - will be.

                Being new to kids' parties, I'd love to hear other ideas for budget-friendly birthdays. From food to themes to cake to activities, please chime in with your comments!

                Tuesday, December 25, 2012

                Christmas 2012: Temporary Insanity and Peppermint Bliss

                It all began with a simple question from my son's teacher at school -

                "Would you like to help us with the Christmas costumes for the infant and toddler classes?"

                Weeks later - surrounded by onesies, tulle, and felt, frantically sewing what would be peppermint costumes for eleven children - I had to laugh at my ability to volunteer for projects that can't help but spiral a bit out of control.

                While there were more than a few moments I wondered at my sanity in taking on such a big commitment right before the holidays (which, at least in our household, is both the merriest and busiest time of year), the truth is that I love projects where I can be creative and help others. Figuring out how to make costumes that were cute and festive on a budget - and perhaps most importantly, EASY - helped to get me in the Christmas spirit (well, that and the big glass of wine I poured to celebrate when the last peppermint was complete).

                Should you ever find yourself saying 'yes' to crafting Christmas cosumes for a class full of children (or just you own), here are some simple instructions on how to make peppermints for less than $1 a piece. Merry Christmas!


                Materials
                Red, green and white felt (I made red peppermints for the girls, green for the boys)
                Tulle
                Glue
                White thread
                White onesies or t-shirts (nearly every child out there has an old one to donate to the cause)


                1. Cut a white felt circle for each peppermint about the width of a onesie. I used a medium sized bowl as a guide.
                2. Cut green and red felt circles and free-form draw peppermint shapes on each. Cut along the lines to create the peppermint 'swirl' pieces.
                3. Glue the swirls to the white circles. I found that regular Elmer's glue worked best - though be careful with the amount so you don't soak through the felt.
                4. Once your felt peppermints are ready, it's time for the tulle 'wrapper.' Cut a square of tulle large enough that it wraps around the peppermint like a taco (with the open seam to the center back of the peppermint) and you have at least 6 inches of overhang on each side. It's better to leave too much on each side than too little - you can trim later.
                5. As you make your peppermint tulle tacos, pin them to the onesies. At the end of this, all of your onesies should have peppermints pinned in the middle with the tulle in a rectangle form (open seam of tulle tucked between the peppermint and the onesie) and about 6 inches of overhang of tulle on each side.
                6. Get out your sewing machine and white thread, and sew around the edge of each peppermint so that in one swoop you sew both the peppermint and the tulle to each onesie.
                7. Use scraps of tulle to tie the overhang of tulle fabric on each side of the onesies, creating the little tuft of 'wrapper.' Trim the tulle to your liking.
                8. Ask all of the parents to bring something white or khaki for the bottom - tights, pants, etc.
                9. Have a big glass of wine.
                10. Done! *


                * On a trip to Target I came across some cute peppermint bags and mistletoe headbands in the $1 bin. In this case, I pushed the 'easy button' and gladly paid $22 for headpieces and bags (which I filled with bells and sewed shut) to outfit the whole class.

                Wednesday, November 7, 2012

                Bringing crochet, and Yoda, back from the '70s

                This being my son's first Halloween, I was inspired to try my hand at crafting his costume. It needed to be cute but not girly (my husband quickly vetoed a lamb) and, of course, inexpensive. After much scouring of Pinterest, I came across the perfect idea - Yoda. My husband loved the Star Wars theme and the key element of the costume - the hat - presented the perfect opportunity to dig my crochet hook out of the black hole it had fallen into.

                Channeling the force...
                I headed to my local yarn store (Yarns on First in Napa) and found the perfect shade of green yarn in the sale bin for $7.00. After a trip to the fabric store for some cream and brown felt for a coat and belt - for a grand total of $1.29 - I had all of the materials necessary to channel the 'force' and transform our little guy into Yoda.

                The coat and belt were ridiculously easy - I cut a square of cream felt to wrap around him like a jacket and made two slits for arm holes. The belt was one long piece of brown felt cut about 1.5'' thick.

                The hat was another story. I hadn't touched a crochet project in at least five years and the prospect of reading a pattern - let alone figuring out how to single/double/half-double crochet again - was a little daunting.

                Somewhere along the line I discovered Ravelry, an online community of crocheters and knitters where ideas, projects and patterns are shared. After signing up for a free account, I searched for "Yoda hat" and came across a few patterns that offered me a starting point. I picked out two - here and here - that had the look I was going for and didn't appear too complex.

                I then sat down with the yarn, a 6.5mm crochet hook, my two patterns, the Crocheter's Companion (a good investment on my part years ago), said a little prayer for patience, and started crocheting.

                After many failed attempts (my prayer for patience must have been answered), I ended up with a hat that I'm very happy with. It's a little big and certainly not perfect, but was a manageable project for a novice crocheter. I used elements of each pattern for the final result and made changes along the way as I remembered how to wield my crochet hook. Below is the 'bastardized' pattern that resulted, along with some instructions that I would have found helpful the first time around. I thank the ladies that wrote the original patterns for guiding me along the way!


                Yoda Hat

                Begin by making a magic loop (watch this YouTube video for a how-to)
                Row 1: 10 dc (double crochet) in the magic loop. Join with 1 sl st (slip stitch) in the first dc.
                Row 2. Ch 3. Increase by making a cl (cluster stitch) in every dc from the previous row.
                Row 3. [1cl, 1dc] (this means repeat the pattern 1 cl, 1dc, 1 cl, 1dc, 1cl, 1dc, etc. for the entire row)
                Row 4: [1 cl, 5dc] (same as above, repeat the pattern in the brackets for the entire row - 1cl, 5dc, 1cl, 5dc, etc.) 
                Row 5: [dc] Repeat row 5 until the hat is large enough.

                Yoda Ears
                Start with an 8-10 inch tail for sewing ear onto cap.
                1. Chain 16, dc in 2nd ch from hook and continue down the chain. Ch 3 & turn.
                2. dc in each dc across, ch 3 and turn. Repeat this row so that you have a total of three rows that are all the same length.
                3. On the fourth row, sctog (this means skip) the first 2 dc, dc to the 2nd from last dc.  Sctog the last 2 crochet, ch 3  & turn (this will make the end of your ears into a triangle shape - in a nutshell, you are reducing the length of the row by 2 on each side as the triangle narrows). Continue until the ear naturally completes as you get to the end of the triangle. 

                Attaching the Ears

                Using the 8-10 inch yarn tail you left when you started the ear, begin by sewing that through the very bottom of the ear and then pulling the yarn tight so that you 'gather' the ear - this will create the cone shape at bottom of the year. Tie off the yarn so that the ear stays in that cone shape.  At that point, simply place the ears on either side of the head and use the remaining yarn to sew onto the cap. Trim any long ends and sew into the cap. You're done!